
Ice Cream Craft Stick Project
You know those days when your kids are bouncing off the walls, and you’re this close to handing them the entire carton of ice cream and calling it lunch? Here’s a better idea: craft the ice cream instead.
This adorable ice cream craft stick project is all the fun of a sweet summer treat, minus the sugar crash. It's bright, cheerful, and guaranteed to make any kid feel like a crafting rockstar. Bonus: no one ends up sticky.
So let’s get those glue guns heated up and prepare to fall in love with a scoop that never melts.

What You’ll Need for This Ice Cream Cone Popsicle Stick Craft
- Jumbo craft sticks
- Wiggle eyes
- Acrylic craft paint – light brown, dark brown
- Craft felt – white, brown, lavender, light pink, bright pink
- Pom poms
- Scissors
- Paintbrush
- Black marker
- Pencil
Pro tip: This is a great excuse to finally clean out that mystery bin of craft supplies you swore you’d organize six months ago.
Extend the ice cream vibes from craft table to style with this adorable pom-pom ice cream cone necklace craft—a wearable, hands-on twist your summer crafters will love! Try this Ice Cream Kindness Challenge to sprinkle a little kindness into your ice cream fun. It's a sweet way to pair community building with your craft time!
How to Make a Craft Stick Ice Cream Cone
Ready to get crafting? Find the instructions below!
Ice Cream Craft Project

Cool off with this sweet popsicle stick ice cream cone craft for kids! A fun, no-mess summer project perfect for pretend play, decorating, or party fun.
Materials
- Jumbo craft sticks
- Wiggle eyes
- Light brown acrylic craft paint
- Dark brown acrylic craft paint
- White felt
- Brown felt
- Lavender felt
- Light pink felt
- Bright pink felt
- Pom poms
- Black marker
- Pencil
Tools
- Scissors
- Paintbrush
Instructions
- Gather your supplies.

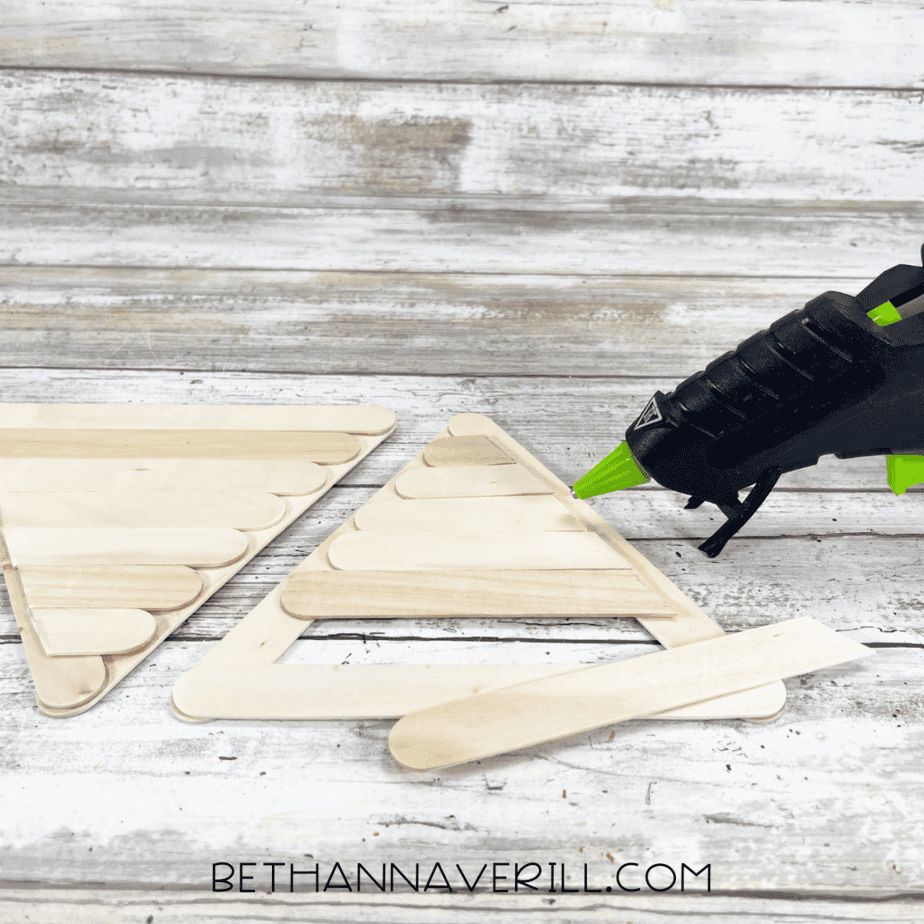
- Start by forming a triangle with three jumbo craft sticks. This is your cone base. Glue the corners together so they hold like a champion.

- Lay a few more sticks across the triangle (they’ll become the back of the cone), and mark them where they need trimming.
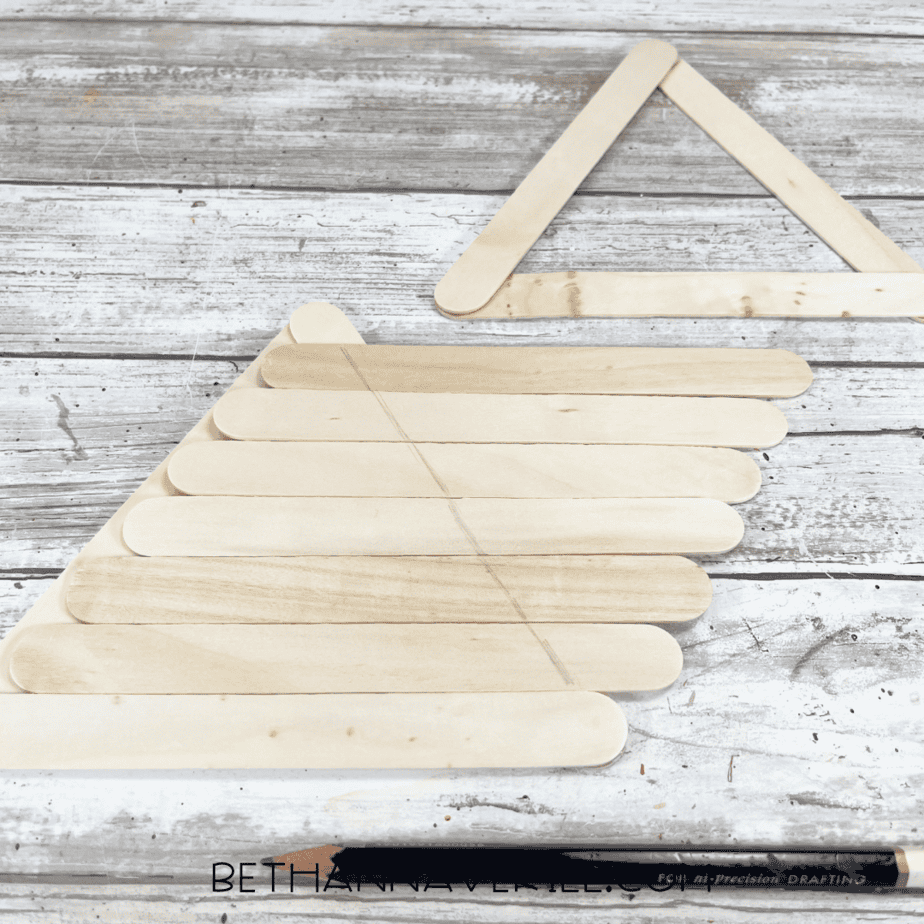
- Trim the sticks down and glue them across the back to strengthen the cone structure. If this step feels like construction work, congratulations, you’re now a dessert engineer.

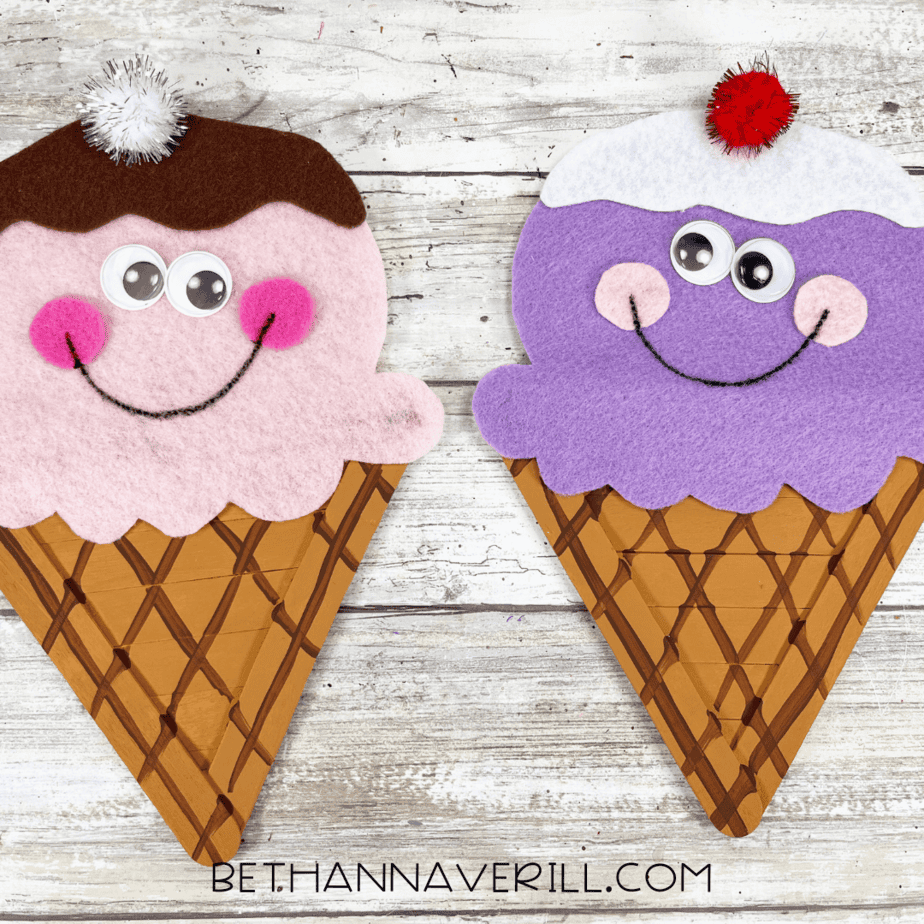
- Paint the cone light brown.

- Let it dry, then add a crisscross waffle cone pattern using dark brown paint and a steady-ish hand.

- Trace and cut out ice cream scoops from pink and lavender felt. Go wild here, if your kid wants rainbow sherbet, mint chip, or radioactive green, let them dream big.


- Cut out the “drippy topping” pieces using white and brown felt. These will make it look like syrup is melting down the scoop. Yes, we’re going full gourmet.


- Glue the scoops onto the cone, then layer the toppings right on top.

- Cut out two little cheek circles from light and bright pink felt, and attach them next to the wiggle eyes.

- Glue on a pom pom cherry, and use your marker to draw a smile from cheek to cheek.

- And there you have it: the happiest ice cream cone to ever exist without getting stuck to a sidewalk.
Recommended Products
As an Amazon Associate and member of other affiliate programs, I earn from qualifying purchases.


So… What Do You Do with a Crafty Ice Cream Cone?
Let’s be honest, this little guy isn’t destined for a drawer. Here’s how to give your smiling scoop the attention it deserves:
1. Turn them into place cards – Add a name to the scoop or a speech bubble and let them greet guests at your summer party (real or imaginary).
2. Build a pretend ice cream shop – Craft different “flavors,” create a menu, and let the kids take turns being customer and cashier. No sticky hands, no tears, just pure imagination.
3. Pair it with a book – Read something sweet like “Should I Share My Ice Cream?” by Mo Willems or “The Ice Cream King” by Steve Metzger, and then craft your own royal treat.
4. Decorate your space – Hang them on a summer bulletin board, stick them on the fridge, or string them together for a “cool” little garland.
Craving more playful projects? Check out our full lineup of popsicle stick crafts for kids, or scoop up more delicious inspiration from our food activities for kids. Trust us, this cone’s got friends.
Please Share This Ice Cream Craft Stick Project
Your shares are how this site grows and I am sincerely grateful. Know a friend who’d like this? Please share it on Facebook or save it to your favorite kids’ activity board on Pinterest.


