
Walrus Craft Stick Project
Let’s be honest: walruses are basically the old men of the Arctic. They've got the whiskers, the tusks, and that grumpy-but-lovable energy that screams, “I’ve seen things.” So naturally, we had to turn one into a popsicle stick craft.
This Walrus craft stick project is perfect for preschoolers and early elementary kiddos, especially during those long, snowy days when you’ve run out of indoor ideas and can’t take one more episode of whatever show they’re currently binging. It’s the perfect combo of gluey fingers, painty messes, and “LOOK WHAT I MADE” pride. Whether you're breaking out the supplies on a snow day, adding it to your Arctic animal unit, or just need something to keep tiny humans from asking for another snack… this walrus has you covered.
Grab your glue sticks and get ready to meet your new cold-weather bestie.

What You'll Need for This Walrus Craft Stick Art
- Popsicle sticks
- Googly eyes
- Brown paint
- Paintbrush
- Scissors
- Glue stick
- Pen
- Double-sided tape
- Black, white, and brown construction paper
- Walrus template (optional, but helpful!)
Now go ahead and mentally prepare yourself for the part where your child uses way too much glue and proudly declares it “extra strong.”
Let’s Make a Walrus!
Ready to get crafting? Find the instructions below!
Walrus Craft Stick Project

Make this easy and adorable Winter Walrus popsicle stick craft with kids! A perfect winter activity to pair with Arctic animal units or a fun snowy day at home.
Materials
- Popsicle sticks
- Googly eyes
- Brown Paint
- Glue stick
- Pen
- Double sided tape
- Brown construction paper
- Black construction paper
- White construction paper
Tools
- Paint brush
- Scissor
Instructions
- Lay out all your materials like a mini art tornado is about to hit. Make sure the craft sticks, paper, glue, and eyes are all within reach.

- Line up four jumbo craft sticks vertically. Cut two shorter pieces to tape across the back horizontally. This is the foundation of your walrus masterpiece.

- Tape the horizontal sticks across the back to hold everything in place. It should look like a little picket fence.

- Flip your base over and paint the front brown. Cover every inch like you're frosting a very flat, wooden cake.

- While your paint dries, cut out the walrus face pieces from paper: brown for the snout, black for the nose, and white for the tusks.

- Lay out the face pieces and double-check the placement. Tweak until you're satisfied. Crafting is all about trial, error, and cute snouts.

- Glue the snout and tusks onto the painted sticks. The tusks should peek out just below the snout like a sleepy sea creature.
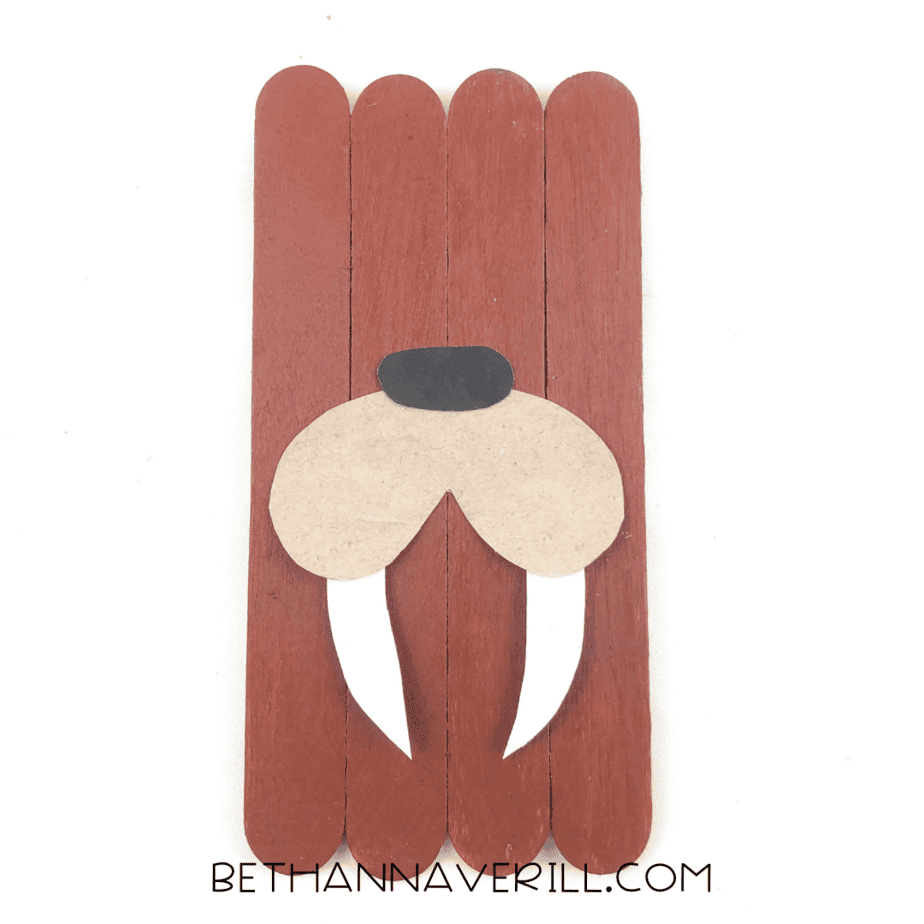
- Add the googly eyes and black nose right above the snout. It’s alive! (Well, almost.)

- Optional but adorable: add freckles to the snout using a black marker. Don’t overthink it - just dot and go.

- Ta-da! Your walrus is complete and ready to chill on the fridge, bulletin board, or Arctic animal display.

Recommended Products
As an Amazon Associate and member of other affiliate programs, I earn from qualifying purchases.


So, What Do You Do with a Popsicle Stick Walrus?
Well, aside from admiring how ridiculously cute it is, here are a few ideas:
Turn it into a winter puppet: Hot glue a jumbo craft stick to the back and suddenly your walrus is ready for some dramatic Arctic storytelling. Add a polar bear or a snowy owl to your cast and put on a living room puppet show.
Use it in a science unit: This craft is an easy intro to talking about Arctic habitats, how blubber works, or why tusks are so important. You can even freeze a bowl of water and have your walrus “swim” on the ice to see how animals live in frigid environments.
Make a bulletin board blizzard: If you're doing this in a classroom or co-op group, these look amazing lined up against a blue-paper background, especially with some cotton-ball snow.
Pair it with a book: Read “I Am the Walrus” by Michaela Gallaway or “The Walrus Who Escaped” by Rachel Qitsualik-Tinsley and talk about walrus adaptations and conservation.
The best part about this Winter Walrus craft? It’s not just another project that gets forgotten at the bottom of a backpack. It’s a conversation starter. A classroom display hero. A quirky, big-toothed reminder that learning can be hands-on and hilarious.
Want more ideas like this? Check out our collection of popsicle stick crafts for kids, or dive deeper into the cold with more Arctic animal activities. Your glue sticks will never be bored again.
Until next time – stay warm, stay creative, and beware the walrus stare.
Please Share This Walrus Craft Stick Idea
Your shares are how this site grows and I am sincerely grateful. Know a friend who’d like this? Please share it on Facebook or save it to your favorite kids’ activity board on Pinterest.


